Setting up JupyterLab
Overview
Teaching: 10 min
Exercises: 0 minQuestions
What is JupyterLab?
How do I invoke JupyterLab from the ORC Dashboard?
Objectives
Explain what JupyterLab is and why we are using it
Explain how to run JupyterLab on Hopper
Explain what you can do with JupyterLab
Why do we want to use JupyterLab?
We have been using the command line in a terminal window to type and execute our Python commands. While it can be very handy to run either simple commands or (as we will see) big programs this way, it is not a nice interface for anything in between, including when we write and debug our Python code.
We will use a browser-based interface called JupyterLab
which lets us create notebooks with cells containing our Python code
as well as notes and annotations that use a simple formatting paradigm called markdown.
Jupyter notebooks are also ideal for scientific research because they make it easy to document our work,
include equations in our documentation, show our analysis results,
and link to other resources like journal articles.
Let’s set it up and see what it can do!
Launch JupyterLab
1. Login to the ORC Dashboard
From your browser, go to the ORC’s OOD dashboard and log in.
2. Launch JupyterLab
Click on the JupyterLab app. It will launch a process that will run your instance of JupyterLab on Hopper.
3. Choose your parameters.
Do not add any extra arguments, and let your partition be “interactive”.
Select the number of hours for your session (for in-class use, 2 hours is a good choice).
By default for the instance size, you will get a “small” session (2 nodes, abut 4GB). This should be fine for our work in class. However, once you start your class project, if your dataset is large or the analysis you do requires a lot of memory, you may want to choose “medium” or “large”.
4. Launch your JupyterLab session
As with launching your Hopper Desktop, there will be a pause of a few seconds to minutes while your session is set up. Your list of “My Interactive Sessions” will say “starting”.
Once it is ready, click the button labeled “Connect to Jupyter”.
Your JupyterLab session will start in a new tab in your browser.
Other ways to run JupyterLab
You can launch JupyterLab directly from a terminal window on your Hopper Desktop: ~~~ $ jupyter lab ~~~
This method has some differences from using the JupyterLab app in the Dashboard: 1. Your JupyterLab session will not appear in your laptop’s browser, but in a browser on your Hopper Desktop (Firefox) 2. Your JupyterLab session will end when your Desktop session times out - it does not have a separate timer. 3. Your JupyterLab session will run with the environment that exists in the terminal window where you lanched the command, and not in the default environment available from the Dashboard app. This can be an advantage if you need to customize your session (e.g., before starting Jupyter lab you might load key modules needed by special Python libraries).
JupyterLab can also be run directly from terminal windows, bypassing OOD and the Hopper Desktop completely. This involves running a private Jupyter server on Hopper and a matching client on your laptop. This appraoch requires substantially more setup (it’s how JupyeterLab is run on the COLA machines), and should be used only if the other approaches are not adequate for your needs.
See your instructors if you think you may need this option.
Your JupyterLab interface
It is worth getting familiar with the JupyterLab interface. Full documentation is available online, and it is worthwhile to take the time read through it, as you will probably spend a lot of time in this interface, in this class and beyond.
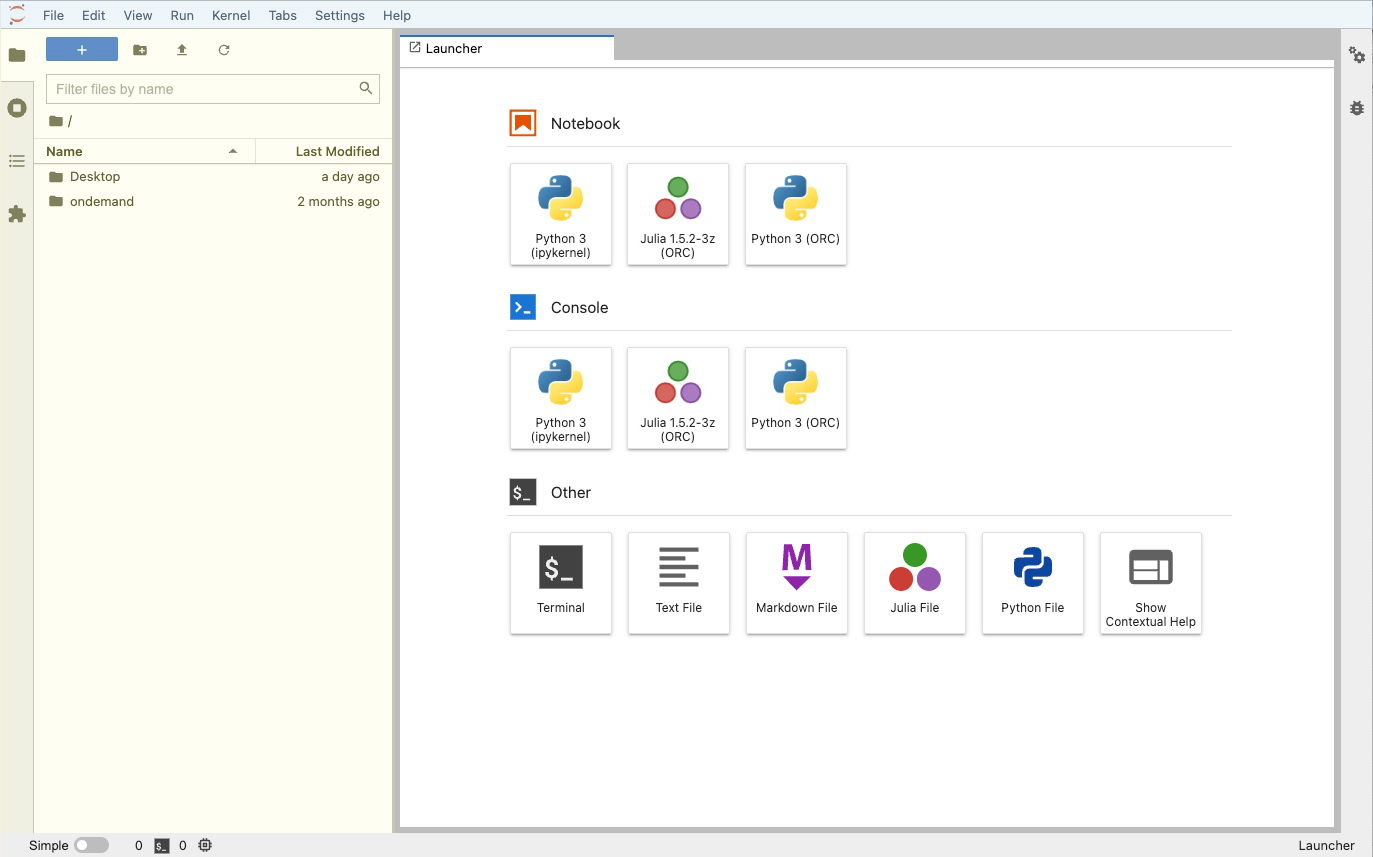
We will go through the basics here. You should see something like this:

There are the following parts to the interface: 1. A menu bar (here tinted blue, but yours will be white) * This is very much like the menu bar on any computer app, with multiple dropdown menu options 2. A left side bar that is grey and has four tabs: * The file browser that should be open (here tinted yellow) * A listing of open notebooks, kernels and terminals * A table of contents for open notebooks * An extension manager 3. A right side bar that is grey and collapsed, containing: * A property inspector * A debugger console 4. A status bar across the bottom that is also grey, which shows things like: * Kernel status * Number of running kernels * Current editing mode * Cursor position in the cell 5. The main work area that is probably open to a single tab called launcher
The launcher allows you to open three kinds of tabs:
1. Python notebooks (a selection of available kernels are listed)
2. Consoles, just like what you would open if you launched python in a terminal window.
3. “Other”, which includes:
* Terminal session launcher (yet another way to launch a terminal session on Hopper)
* A markdown file editor (can be a handy way to keep notes, e.g., a description of your workflow for a multi-step analysis that uses multiple notebooks and scripts)
* A python script editor
* And some other specialized editors
We will now explore the JupyterLab interface together in class.
Key Points
JupyterLab is an interactive Python interface that is ideal for scientific work
Launching JupyterLab from the OOD Dashboard is a straightforward process